Hey all, hope things are well. Making a quick post as I’ve done some work on my gaming rig and wanted to share!
My gaming computer and main rig is something I use every single day and so it fulfills a few roles: Binging Youtube and Plex, gaming with friends and video conferencing. It’s been stellar for this over the last couple of years but has started to get a little “slow” for my tastes. Previously, I was running:
- Ryzen 5 3600 with Wraith cooler (this baby ran HOT)
- X570 AORUS ELITE mobo
- 32GB Corsair RGB RAM at 2133MHz (more on this later)
- 1TB Samsung 980 Pro NVME
- Cooler Master MasterCase H500 ARGB Airflow ATX Mid-Tower
Noting the RAM: There is an issue with 2nd and 3rd gen Ryzen CPUs when running 4 DIMM slows where the RAM crashes or won’t run at full speed. I lived with this for a while but between that and the CPU the system was starting to get bottlenecked when compared to newer systems.
So, the goals for the new system:
- Same use cases: video, gaming, conferencing
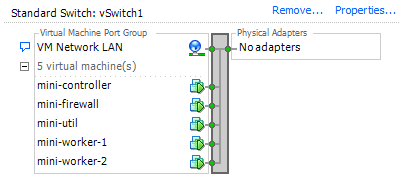
- Virtual work using VMWare Workstation to build some Kubernetes labs and similar to tinker with
- Cooler CPU and RAM running at full speeds finally
- Use the same case, storage, mobo and power supply as before
Sick of lists yet? Well here’s one more  The NEW parts! After some BIOS updates and chipset drivers, here’s where I landed:
- Ryzen 9 5900X 12C/24T
- 64GB Corsair RAM (4 X 16) running at 3200MHz
- NZXT Kraken 240 – RL-KN-240-B1 Liquid cooler for the massive CPU upgrade
With everything together the system has become a powerhouse. I ran into some initial issues with random crashes I ironed out by turning up the voltage adjustments a little. I’m not running a stable 4.95GHz idling around 50C and with load temps around 78C. MUCH better than before with a more powerful and much faster CPU. The system absolutely flies now and I’ve been playing with more virtual machines while playing video games and everything is running perfectly. Looks like I’m settled with this build for a while but I’ll post more if I make any more changes.
Thanks for reading, cheers and hope to see you again!