Today I set up another Nextcloud server after taking the former one offline due to the size of backups for it getting a little out of hand. This also allows me to run the latest current version of Ubuntu Server (22.04LTS).
Here’s the guide I followed with a fresh install of Ubuntu:
Welcome back! Today I’m working on a project to secure my web surfing to be an anonymous as possible using a combination of a software package called “Pi-Hole” and a VPN provider.
So, let’s start at the basics: VPN and DNS
DNS, or Domain Name System, is how we access data on the web. Think of it like a pointer: When you go to facebook.com, your request goes to a DNS server which takes the website name (facebook.com) and converts it to an IP address of a server to access the website. Example:
Notice the 31.13.67.35. This is the IP address of Facebook’s server to connect to their website. Neat, eh? This is how most web access occurs except for rare circumstances where you would need an IP directly.
Now, VPNs.
VPNs are marketed as a way to hide your browsing and activity online, and this is true in most cases. VPN stands for “Virtual Private Network”. In a nutshell, they create a “tunnel” through which all of your web browsing goes through this encrypted tunnel so your ISP cannot see what you’re doing. This offers a great level of privacy but doesn’t prevent website tracking cookies, so there are limits to it. Most VPN services (Nord, Mullvad, TorGuard) all claim to use 0 logging on their systems; Even if ordered by a court, they do not have logs on your browsing history. Yes, this does sound a bit sketchy but even a normal user/person can benefit by not being tracked by your ISP, having your data sold to advertising companies.
So what happens if you want the ad-blocking that Pi-Hole offers along with the privacy of a VPN? You build your own DNS (Pi-Hole) server and set it up to be as anonymous as possible.
I followed the below guide for my build using Ubuntu 22.04LTS and ignoring the NetData portions (not needed for my use cases):
There’s a couple configuration changes needing to be made to help us keep the Pi-Hole from logging any requests:
In the GUI/Admin interface, go under Settings > Privacy (tab), select from the options “Anonymous Mode”. If an error occurs, go into Settings and click “Disable Query Logging”, then “Flush Logs (last 24 hours)”. This will disable all Pi-Hole logging
Modify the file:
sudo nano /etc/unbound/unbound.conf.d/logs.conf
Edit it to look like this:
# enable query loggingserver:
# If no logfile is specified, syslog is used# logfile: "/var/log/unbound/unbound.log"log-time-ascii: nolog-queries: nolog-replies: noverbosity: 0
With these options set, there is no longer any logging on the server.
For the final part of all of this, a lot of VPN providers allow custom DNS servers to be used. Take the IP address of your DNS server and enter it into the custom DNS server of the VPN and connect. You should be able to use the internet over the VPN as before, but now you have your own controlled adblocking via Pi-Hole and the security of knowing your server does not keep logs or any history. You should, assuming your VPN is trustworthy, be essentially invisible on the internet now.
I hope this write up was helpful! I’ve been tinkering with these projects for some time off and on.
One last tip: If you find a website is blocked improperly from Pi-Hole, you may need to enable logging again (reversing the items from Step 1, above) to whitelist the problem domain. Don’t forget to turn logging back off after!
Been a while since I posted! I recently began an upgrade project for my Linux virtual machines which ranged from 14.04 to 17.04. The goal was to get everything on 22.04LTS. One of the issues I ran into (3 times so far) is with Apache not working:
apache2: Syntax error on line 146 of /etc/apache2/apache2.conf: Syntax error on line 3 of /etc/apache2/mods-enabled/php7.4.load: Cannot load /usr/lib/apache2/modules/libphp7.4.so
After some google searching, I came across the below fix which hopefully helps others too:
A little background: Some years back I learned a very hard lesson about losing power on a RAID array that didn’t have an onboard battery backup. The result was ~7TB of data gone, about 1.5TB completely irreplaceable including old school work and photos. This was a hard pill to swallow and helped me get better about redundant backups and another thing that was especially important: UPS backups, or Uninterruptible Power Supplies.
A UPS is a device which provides power for a short time during a home or business power failure by providing an AC output to whatever is plugged into it. I have several of these scattered throughout my home, including for my desktop and a couple lights around the house which act as emergency lighting using older, smaller UPS devices. My servers are always running UPS backups, but on a big larger scale.
My company was kind enough in the fall of last year to be giving away a large amount of hardware. In this was a 2U style UPS system which can run all of my (4) 2U servers, firewall and backbone switches in my basement for about 30-40 minutes. I also, however, had my old UPS backups: a 1350VA and 1500VA systems. Now, I wanted to use these to their maximum potential.
I had to move around the server rack (store bought metal shelving FTW) and it gave me a great opportunity to plan ahead for what I wanted to do. Most servers come with redundant power supplies; That is, they allow multiple inputs, so if one power supply fails or is no longer providing/receiving power, the server will switch to the other without interruption or power loss. Neat, eh?
I ran all the primary power supplies into the new UPS backup and then routed all my secondary power supplies and networking hardware into the older UPS units. This allows a total runtime somewhere in the 40+ minute range during a power outage. Not bad, but there’s a catch: How do I shut down (2) ESXI hosts, (2) unRAID hosts and multiple other smaller systems when the power is out and I need remote access? Simple: Battery backup on my desktop in my office.
I used yet another UPS unit in my office and ran a dedicated 10GB SFP line to my core switch in the basement which is also on a UPS. This allows my desktop to run somewhere between 25-30 minutes off power along with some LEDs in my office acting as emergency lights essentially, and one large monitor. I’ve done testing but I finally had a real situation pop up.
Last night we had quite a wind storm and the power was out for about 30 minutes or so. Sometimes my power flashes for 1-2 minutes but this was a long outage it seemed. After ten minutes, I logged in and began gracefully shutting down the VMs on the ESXI hosts and shut down my two unRAID hosts as well. In just a few minutes, my entire network was gracefully shutdown, without data loss or interruption. Adding to this, I was actually in the middle of a hard drive swap on one of my unRAID hosts which was done without issue due to the UPS backups. Another win for preparedness.
I hope this gives you, the reader, some ideas for a home network or a small business and shows why this is so important; Had I had a complete power failure without the battery backups, I could risk losing multiple 10’s of terabytes of data and could have corrupted the disk rebuild on my unRAID system. A little planning goes a long way in this case. Plus, it’s just cool; Why else would we homelab? Cheers!
Wikipedia is a vast archive of knowledge and information we tend to forget is there. An encyclopedia of knowledge brought by users and edited by a community, it has a high accuracy rate and information on just about any subject you could want. You can also download an entire archive of it at around 90GB at the time of this writing!
I’ve had the idea for a while now about making an offline version to run locally for myself or friends, maybe something just to browse during a flight or roadtrip. Or, as my prepping thoughts say, maybe something for when the power’s out and easy to access! Enter the Raspberry Pi, a low cost and low power computer to run this using a suite of tools you can run off a battery pack and access from one’s phone/tablet/computer. Well, this is easier than you might think! I’ll be going over the ideas and thought processes of this at a high level as the project took some time. I can provide more details if you’d like by reaching out to me at if you’d like.
The goals of this project were as follows:
Use a Raspberry Pi to run this off a battery pack for several hours at minimum
Must be 100% self contained; This should be able to boot, run and provide access without user input
Access must be simple; In this case, a self created Wifi network hosted from the Raspberry Pi
Small, easy to travel with. For this reason I went with a Raspberry Pi Zero W. One of the smallest Raspberry Pi SOC computers that exists (about the size of a large flash drive).
Starting with the basics: Raspberry Pi Zero W. This is a single board computer a little bigger than a flash drive which can be powered by a small USB batter pack and a micro-USB adapter. I installed a 128GB micro-SD card and flashed an image of Raspberry Pi OS onto it (an ARM branch of Ubuntu server).
The next steps were to download a suite of tools called “Kiwix Tools”. This neat set of applications allow you to host a downloaded archive of Wikipedia, providing users a simple web interface just like Wikipedia. Once done, I could then access this over my local network.
Next up was the user hostapd/dnsmasq to build a Wifi network using the onboard wifi chipset to connect to the raspberry pi, provide DHCP and resolving locally which allowed me to connect via any device with wifi. I used a tablet to configure and confirm this.
For the last portion, I installed a LAMP stack onto the system (Linux + Apache + Mysql + PHP) and installed a copy of wordpress. I wanted a way to easily write notes into a webpage for anything to see when accessing this. Information, notes, ideas, etc, this was the easiest way to write and view this. It’s surprising how well this runs off the little system too!
In the end, I have a small ultra low power server essentially which allows me access to a vast amount of information on an almost endless supply of topics, along with WordPress for notes and further information I want to add!
In the future, I may build HTTRACK onto the system to rip websites for offline viewing as well to have even more access and information offline as I want. This was more of a proof of concept system but I’m quite proud of how it built out. Anyways, I hope you enjoyed my rambling and thoughts. Cheers!
There’s two types of people: Those who have backups, and those who will lose data. Several years ago I had a raid card failure on a RAID 5 array (three disks) that lost about 5~ TB of data. Of this, about 1.5 was completely irreplaceable data, things as far back as high school projects. After this, I went into backup mode and always had redundant copies both locally and online (cloud based). At this point I’ve made a pretty solid system for handling this across multiple systems. Lemme walk you through it.
The idea was this: How can I make this easy and simple enough (once configured) that I won’t ever forget to make sure my items are backed up. So here’s how I went about this: Backblaze and a Windows 10 as a share drive.
Backblaze home is a cheap 6 bucks a month for UNLIMITED backups. You can’t beat this cost. I went and built a Windows 10 Pro virtual machine on my ESXI host with the below specs:
6 vCPU cores
8GB RAM
2TB disk space
Now, this may seem a bit overkill but with a large amount of backups, the VM may use a significant amount of RAM and CPU resources to compress and transmit the data. I then took a folder (in this case just on my desktop for ease of use when RDP’d into the system) and set it as a network share for only my user account.
Here’s the trick: Now that this is a shared folder, I can mount it as a network drive on ANY computer on my network. This allows multiple PCs to backup to one account. Neat, eh? Going from this approach, I also set up a couple BAT (Windows Batch script) files to backup my cloud accounts (Dropbox, Nextcloud, Google Drive) to this NAS as well on a daily Task Schedule set to run every night on my desktop. This allows me to have all my files I send to this server updated to the cloud and have redundant copies of any of the important files off my local PCs.
I went a step further from this and also added a BAT script onto the backups system to send to my local unRAID server for a redundant copy of data, and also perform weekly syncs to a normally disconnect external hard drive. The reason for this being disconnected is for a worst case scenario: Cryptoware or entire deletion of my files which is then synced online and to unraid. Having the disconnected external will allow most of my files to be recovered.
Hopefully this encourages others to tinker with this. Backups are important and you may not realize what you’ll lose until suddenly they’re gone; Backups of your video games from early 2000’s that are no longer hosted for instance and all data is now gone. Cheers and happy home labbing.
Each user will start with 1000 EC (EuthonisCoin) paid out of the vault.
Every Thursday, get 100 (maybe 1000 if I can mine enough in between) when you sign on to play or hang out. Every game we play on Thursday after 7PM with 2 or more people: Additional 100 Coin.
Any time we’re playing with 3 or more people, earn the same as Thursdays (If I’m not around, keep track and I’ll send the coins when possible)
Wagers can be made or can “pay off” players for certain fun (IE Pay Chwaee 100 Coin to skip his next turn in worms; Pay 500 Coin to reverse your keyboard or controller while playing).
Ongoing rules/ideas:
100 coin: whoever can complete an objective first in KF2 (all other players pay 10 to this person)
500 coin: take a drink/hit.
1000 coin: talk in a funny accent until a round is over/Say a certain word in every sentence
1000 coin: skip turn in Worms
2000 coin: only use one type of unit in SC2
2500 coin: only use starting weapons in KF2
2500 coin: skip one entire hole in Golf
5000 coin: reverse keyboard/controller for the round/match
Lottery: Donate coins to a pool as a reward for something (maybe winning Golf after skipping a hole? Most kills in KF2 while only using starting weapon?). Could also dump a bonus from the mining system to someone as well.
Clearing old instance of EuthonisCoin:
Make sure the application is closed.
Delete former application and/or folder containing it
Hit buttons: “WIN + R” OR hit the start menu, type “run”, Enter
Enter %APPDATA% and press OK
Delete folder “EuthonisCoin”
Close explorer window and relaunch application and it should connect once more and update.
After saving up for this handheld, I pulled the trigger on this recently and have been pretty impressed overall. The system runs buttery smooth, comes preconfigured with a large number of emulators and ROMs and just generally feels like a solid little handheld from the hay-day of Gameboy goodness.
Running at 100 bucks with a micro-SD card, the system isn’t super expensive when compared to my Nintendo DS with a custom Kart to run roms (about 90 bucks total and much more limited in what it can do in comparison). This handheld even plays PSX roms without issue and has excellent loading times when compared to my playing times as a child.
Things of note:
Quick to boot. Plays games very well once you find the right roms. Surprised it plays PSX roms as well as it does (Vigilante 8, Driver, Crash Team Racing each for 30 mins or more without issue).
The system will randomly not boot (stuck on black screen) but hitting the reset button immediately resets and fixes it.
Came with 32GB MicroSD card loaded with ROMS which makes managing them much easier. Comes with a bunch of emulators (including DOSBOX which is neat) and all are preconfigured and just work which is excellent.
Lots of menu options that make it pretty solid to use. Can also save game states to come back to them if the games don’t support saving (very neat feature).
Worth 100 bucks? I’d say so for sure, especially with the loaded SD card.
I’m going to be spending a lot of time tinkering with this. It appears it supports networking (guessing via one of the two USB-C ports) so will need to check that out for easier ROM management off my internal SFTP server. In the meantime, I’ll be reliving my childhood on a 4 inch screen.
I’ve been looking over various NAS (Network-Attached-Storage) operating systems for some time now. Naturally, there’s two big players in the game that everyone seems to go to: FreeNAS and unRAID. Both boast a considerable user base, community add on support and a ton of customization but one big difference at a quick glance: FreeNAS, as the name implies, is free while unRAID is a pay for licensed OS. But a quick glance only shows so much.
After spending several months going back and forth, I decided to do some testing with unRAID. One of the biggest reasons was my mix of various extra hard drives I have that I wanted to use in the pool for the software RAID configuration. FreeNAS requires matching disks in pairs and I have odd sets of drives ranging from 4, 8 and 12TB capacities. I initially did some testing on an old 2U with 6 X 1TB disks to test and get used to the GUI. I then upgraded one of the disks in the array to a 2TB disk to see the process. Spoiler: stupid easy and straight forward, exactly what I want. It was time to go big on the build.
I purchased a Dell R510XD server for this project: 32GB ECC RAM, twin 6 core Xeons and 12 bay capacity; Perfect amount of drive bays and overkill on CPU and RAM for future proofing. Unfortunately, this was the beginning of a bit of a tough learning process…
Being new to software RAID, I forgot to take into account the hardware RAID card. The H700 card onboard does not support JBOD (Just a bunch of a disks) which allows an operating system to see ALL individual disks and build the software raid from this. I had to bite the bullet and order another RAID card and cables that would support the proper config. 50 bucks later, I was in business.
The initial configuration was this: (2) 12TB disks for parity, (4) 8TB disks and (5) 4TB disks for the storage pool. With the dual parity disks, this allows up to 2 disks to fail without data loss. The initial RAID parity burn in took about 30 hours which isn’t bad over all. Unfortunately, I soon found the write speeds with the software RAID to be less than stellar, something unRAID is known for. I took the next step of adding a 1TB SSD as a cache disk to mitigate this issue and can now sustain gigabit throughput on uploads without issue.
Onto the software side of things, I’ve added a few of the usual plugins (Community Applications, Calibre, Plex and others). The installs take all of 30 seconds and typically run with a dedicated docket instance, something I’ve never tinkered with prior but am quickly falling in love with for its simplicity and ease of maintenance. The software RAID seems robust, the GUI is sleek and modern and everything is snappy and well laid out. I went through and upgraded capacity replacing one 4TB disk with an 8TB (about 20 hours to burn in) and this again was quick and painless.
One quick thing of note: One of the biggest differences besides the disk loadouts between unRAID and FreeNAS is the performance. FreeNAS boasts considerably higher read/write speeds due to the way the parity works (excellent video summarizing this here). The other is that changing the array (modifying disks, adding, removing, etc) takes considerably more work and effort including CLI management of disks. As someone who’s broken a number of *NIX systems on the CLI, this was a bit of a deal breaker for me. Another difference because of the disk management being different: You can add just ONE more disk at a time to unraid, whereas FreeNAS requires matching pairs to work.
All in all, I’m shocked at how well this project has come together. With the current config, I’m at 56TB raw, 51.8TB usable capacity. The system is used both as a file dump for all my stuff and as a redundant backup system from several other systems due to its capacity. I would definitely recommending trying the software out for free and see how you like it and if it’s for you or your business.
Quick take: Slower than FreeNAS, more capacity, make sure you have a JBOD support RAID card or direct pass through on SATA.
Welcome to another Overly Complicate Project! This time, it started with some advice from our friends at r/DataHoarder and a fun tool called “youtube-dl”. This has taken a bit of tinkering and some custom code, but I now have an all-in-one solution that downloads Youtube videos from a playlist/channel, confirms progress to save bandwidth on future downloads, and stores them into a Plex library for local viewing. Let’s begin.
I first started with a VM running Windows Server 2019. Following the steps below, you can install the WSL (Windows Subsystem for Linux) and have a full Ubuntu/Linux shell to use. I chose Ubuntu 16.04LTS as this is my favorite version of the server software.
This will install all necessary packages needed and get you into a running state for youtube-dl. For my server, I have a 200GB boot disk and a 10TB secondary disk. So, opening the bash shell and changing to that disk, I made a folder called “youtube” to store all my videos into. As a test, you can run youtube-dl against a video of your choosing to confirm everything works. This is a basic command I use for everything which sets the filename, retries, progress file, etc:
-o: Output of Playlist (channel as well)/Title.Extension of file
–format: Best video and audio on the requested video
–continue: continue if this was interrupted at last download progress
–sleep-interval: sleep for 2 seconds between steps
–verbose: verbose output
–download-archive: track progress of downloaded videos to save time and bandwidth in PROGRESS.txt file
–ignore-error: ignores errors and keeps processing
–retries: retries when error 404 or similar found
–write-info-json: output JSON string with information about video
–embed-subs/–all-subs: use ffmpeg to burn in subs into video
The above is what I use for everything except 4K channels which are just too much space to hit in bulk. Using this, I tossed several of those commands into a .sh file such as this:
Then, simply run in your BASH application: sh YOUR_SCRIPT_NAME.sh
Cool, right? Now you have a script with all your commands to download your favorite channels or unlisted/public playlists. One of the cool things with the integration of BASH/Windows is now you can also make a Windows BATCH (.bat) file to launch this. Making a .bat file called whatever you want (runme.bat is my favorite), put in to call the script you built, first changing to your directory of YOUR script to properly run:
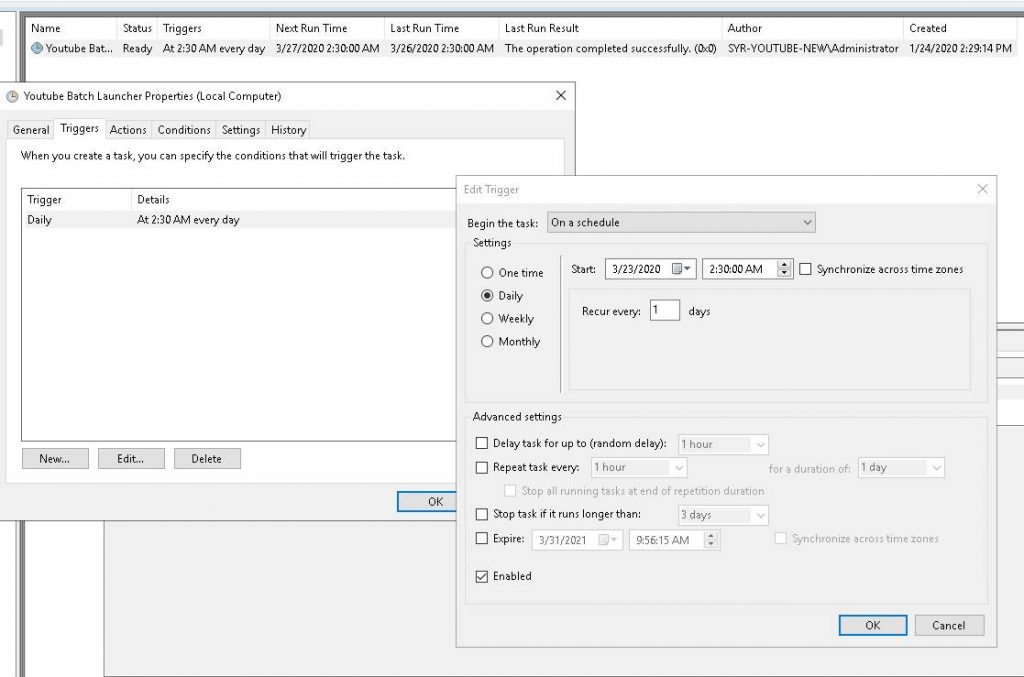
Neat, now you can single click the .bat file to launch your downloads! BUT, there’s something else you can do now: Windows Task Scheduler. Go into “Task Scheduler” in Windows, and create a simple task. In this, set it to whatever time you want and have it run daily/weekly/however you’d like. I have an example here of the one I use:
Have this simply run your BATCH (.bat) file and it will now fire off automatically as you requested. This completes your automated downloads portion. I took this a step further, however, because a lot of my favorite music and music videos get taken down frequently and I wanted a nice, simple way to search and watch/listen to them. Enter Plex.
Grab a copy of Plex server from online and install on your Windows system. Having some horsepower here is definitely recommended: minimum quad core and 6GB+ of RAM (I’m running 8 cores and 12GB due to extra processing of 40K+ videos).
Under Plex, configure a Library of “Other Videos” and search for your top directory where your Youtube videos will be downloading from. It will then scan and add any videos it found by name to make searching easier for the future. I also went into my Plex server options and configured it to check the library for changes every 12 hours or so to catch anything downloaded overnight. I wake up in the morning and my newly downloaded videos are processed and ready for viewing!
I hope you find this interesting and informative. This has been a long project and has gotten very complicated as I built a Perl based wrapper to automate more of this. I encourage you to tinker and make this more effective and easier for your specific situations. Maybe a wrapper script to pull URLs from a file? Good luck and happy tinkering!