VMWare Kubernetes Cluster Build Notes

I built a Kubernetes cluster tonight to try and learn a bit about this technology, here are my notes about building it!

Built on a new ESXI server with the following specs (you’d be surprised how well this rig holds up):

  • Dell Optiplex 7010
  • Core i7-3770
  • 32GB RAM
  • 1TB SSD

Created virtual network only accessible to VMs:

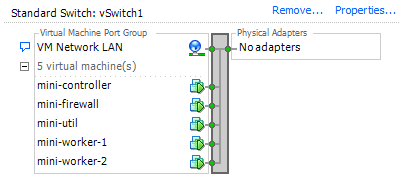
Used pfSense as firewall to keep independent from network and to provide DHCP to internal virtual network. Used a single Windows Server 2019 VM to access WebGUI to control pfSense. Needlessly complicated to do all of this but I wanted to get a virtual network going to test all of this out on.

Built the following VMs on Ubuntu 22.04 LTS:

  • Controller: 2 vCPUs, 4GB RAM, 50GB HDD
  • Worker X2: 2 vCPUs, 4GB RAM, 25GB HDD

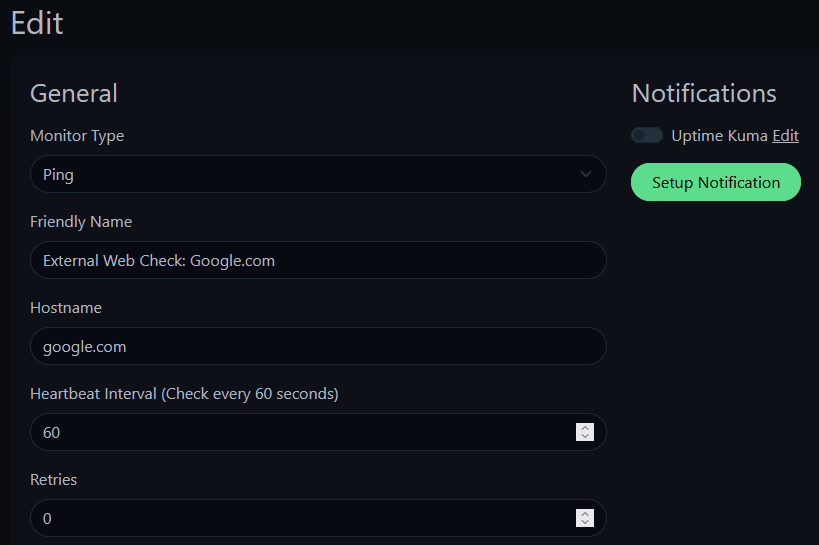
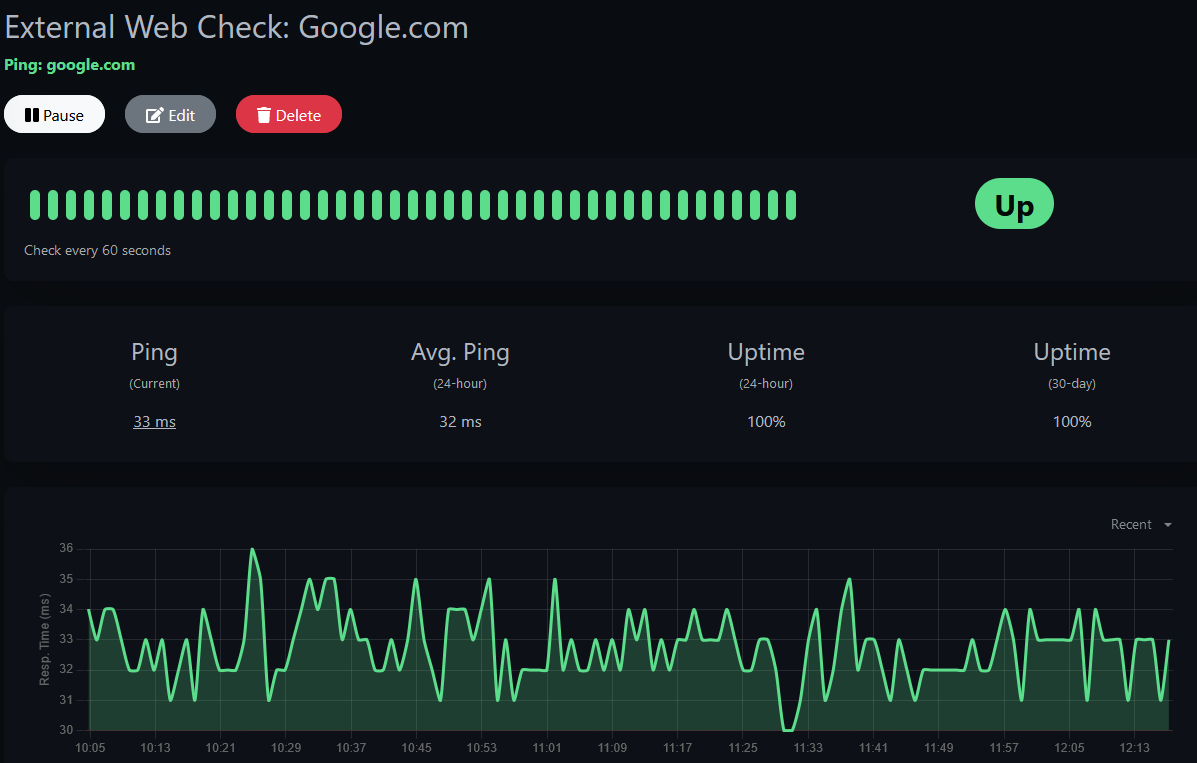
I then set all their IPs in pfSense to keep them from changing. I then used the following guide, specifically the scripts from github mentioned in the article:

https://devopscube.com/setup-kubernetes-cluster-kubeadm/

Command to download scripts:

git clone https://github.com/techiescamp/kubeadm-scripts

Chmod+x both scripts to set executable. Run the “common.sh” script on all systems, both controller and nodes/workers. Edit the “master.sh” script. Change the “MASTER_IP=” portion to your controller’s IP address. Change the network range as needed for the nodes under “POD_CIDR” (I left these as default). Run the script on the controller.

Run this command to get the join command:

kubeadm token create --print-join-command

Run the FULL output on any workers/nodes you want to connect to it. Check connection on master/controller:

kubectl get nodes

Example output:

Note that their roles are set to “none”. Fix by running this command, substituting out the names of the nodes/workers:

kubectl label node mini-worker-1 node-role.kubernetes.io/worker=worker

Then check again to confirm they are now workers:

Congrats! You now have a (slightly dirty) Kubernetes cluster running and ready to assign deployments to! This is the bare basics but should get you rolling, good luck and happy tinkering!

Using Uptime Kuma for Network Monitoring

Welcome back!

Today I’m looking into Uptime Kuma, a monitoring tool that in my eyes is perfect, simple and intuitive and does exactly what I need for monitoring my home network. What is Uptime Kuma? I’m glad you asked.

The Background

Uptime Kuma is an Open Source monitoring solution, perfect for SOHO (Small Office/Home Office) environments where there isn’t a ton of devices/services to monitor. I’ve been looking for something like this for some time after building a very rudimentary monitoring system for myself (relying solely on ping and notifying via webhooks in Slack). This is one of those pieces of software I wish I had known about for years.

The setup is exceptionally simple, especially when using Docker. I simply used a small Dell SFF Optiplex (i3, 4GB RAM, 240GB SSD) running Ubuntu 22.04LTS which is more than capable of handling the 40-50 checks I’m running. Using a dedicated instance instead of a virtual machine on one of my hosts also will allow me to monitor in case those hosts go offline.

The Build

As I mentioned, I simply installed a base image of Ubuntu 22.04LTS to have the latest software running. Then, use snap to install docker:

snap install docker

Then, install the Uptime Kuma docker to run in the background automatically:

docker run -d --restart=always -p 3001:3001 -v uptime-kuma:/app/data --name uptime-kuma louislam/uptime-kuma:1

Fire up a web browser and go to http://YOUR_DEVICE_IP:3001 to set up an admin account and begin working with the software. Note: Installing this way will automatically bring up the docker in the background upon reboot.

Putting it together:

For Uptime Kuma, there are a wide variety of tests and monitors it can use to keep tabs on your network. I’m using a mix of Ping, TCP and DNS checks to make sure my network is working as expected. This also helped me sort out a brief internet outage this morning.

An example of one I use to make sure my internet is actually connected is to simply ping Google.com every minute to make sure my traffic can get to the WAN:

If this goes down, then my WAN connection to the internet isn’t working and gives me an immediate pop up on the page to tell me. The dashboards are pretty cool too:

Neat, so there’s the checks for the internet down to monitor when/if the internet goes down.

One thing to keep in mind is how you name the devices/ports/etc that are being monitored. My solution was to name the test first, then the device in question so at a glance I know what I’m looking at:

From top to bottom: First two are WAN access checks, then TCP port checks for my various servers I host for my friends and I. The TCP port is super handy for monitoring when a process/services goes offline. The third portion is where I begin the Ping tests for my home devices.

The Wrap Up

All in all, this is the solution I’ve been looking for for a long time now. It’s simple, elegant and easy to use while still being extremely valuable as a monitoring tool. The system I run uses a private Discord server to notify me if anything goes down, less than 5 minutes after, normally less than 1 minute. Being able to configure retries and time outs is also very handy too for high latency connections. I can only recommend this software to someone wanting to set up more monitoring for their SOHO network, but I could see this being used for enterprise solutions as well. Uptime Kuma, you have a new fan.

Tekkit2 Minecraft Build notes on Ubuntu 22.04LTS

Assuming a fresh install of Ubuntu 22.04LTS, accepting default options and no extra packages except OpenSSH server to login.

Install zip/unzip:

apt-get update; apt-get install zip unzip

Download archive for Tekkit2 (as of 20221202):

wget https://servers.technicpack.net/Technic/servers/tekkit-2/Tekkit-2_Server_v1.1.3.zip

Unzip:

unzip Tekkit-2_Server_v1.1.3.zip

Install Java and add Repos:

add-apt-repository ppa:webupd8team/java
apt install openjdk-8-jdk

Attempt to launch to confirm server is working:

chmod +x LaunchServer.sh
./LaunchServer.sh

Should take several minutes to load, depending on hardware. If this works, set up cron to similar to below to launch server upon reboot:

root@syr-tekkit:# cat /etc/cron.d/root_gameserver
@reboot root sleep 5 && cd /home/asullivan && /usr/bin/screen -dmS gameserver-screen /home/asullivan/LaunchServer.sh

Open up port 25565 to internet while server is running to connect. Use the Technic Launcher.

Notes from installing Nextcloud on Ubuntu 22.04LTS

Today I set up another Nextcloud server after taking the former one offline due to the size of backups for it getting a little out of hand. This also allows me to run the latest current version of Ubuntu Server (22.04LTS).

Here’s the guide I followed with a fresh install of Ubuntu:

How to Install Nextcloud on Ubuntu 22.04

Following this, I ran into a number of issues here:

Downgrading to PHP 7.4:

apt install php7.4-mysql php7.4-mbstring php7.4-xml php7.4-curl php7.4-gd

Select 7.4 from list:

update-alternatives –config php

Set version:

sudo a2dismod php8.1
sudo a2enmod php7.4
sudo systemctl restart apache2

Install missing php packages:

apt install -y apache2 mariadb-server libapache2-mod-php7.4
php7.4-gd php7.4-json php7.4-mysql php7.4-curl
php7.4-intl php7.4-mcrypt php-imagick
php7.4-zip php7.4-xml php7.4-mbstring

sudo systemctl restart apache2


Building a non-logging, encrypted DNS server

Welcome back! Today I’m working on a project to secure my web surfing to be an anonymous as possible using a combination of a software package called “Pi-Hole” and a VPN provider.

So, let’s start at the basics: VPN and DNS

DNS, or Domain Name System, is how we access data on the web. Think of it like a pointer: When you go to facebook.com, your request goes to a DNS server which takes the website name (facebook.com) and converts it to an IP address of a server to access the website. Example:

euthonis@DESK:~$ nslookup facebook.com 172.31.1.26
Server: 172.31.1.26
Address: 172.31.1.26#53

Non-authoritative answer:
Name: facebook.com
Address: 31.13.67.35

Notice  the 31.13.67.35. This is the IP address of Facebook’s server to connect to their website. Neat, eh? This is how most web access occurs except for rare circumstances where you would need an IP directly.

Now, VPNs.

VPNs are marketed as a way to hide your browsing and activity online, and this is true in most cases. VPN stands for “Virtual Private Network”. In a nutshell, they create a “tunnel” through which all of your web browsing goes through this encrypted tunnel so your ISP cannot see what you’re doing. This offers a great level of privacy but doesn’t prevent website tracking cookies, so there are limits to it. Most VPN services (Nord, Mullvad, TorGuard) all claim to use 0 logging on their systems; Even if ordered by a court, they do not have logs on your browsing history. Yes, this does sound a bit sketchy but even a normal user/person can benefit by not being tracked by your ISP, having your data sold to advertising companies.

So what happens if you want the ad-blocking that Pi-Hole offers along with the privacy of a VPN? You build your own DNS (Pi-Hole) server and set it up to be as anonymous as possible.

I followed the below guide for my build using Ubuntu 22.04LTS and ignoring the NetData portions (not needed for my use cases):

Create DNS-over-TLS bridge with Pi-hole, unbound and stubby on Ubuntu Server

There’s a couple configuration changes needing to be made to help us keep the Pi-Hole from logging any requests:

  1. In the GUI/Admin interface, go under Settings > Privacy (tab), select from the options “Anonymous Mode”. If an error occurs, go into Settings and click “Disable Query Logging”, then “Flush Logs (last 24 hours)”. This will disable all Pi-Hole logging
  2. Modify the file:
    sudo nano /etc/unbound/unbound.conf.d/logs.conf

    Edit it to look like this:

# enable query logging
server:
    # If no logfile is specified, syslog is used
    # logfile: "/var/log/unbound/unbound.log"
    log-time-ascii: no
    log-queries: no
    log-replies: no
    verbosity: 0

Restart the services:

sudo systemctl restart unbound stubby ; systemctl status unbound stubby -l

With these options set, there is no longer any logging on the server.

For the final part of all of this, a lot of VPN providers allow custom DNS servers to be used. Take the IP address of your DNS server and enter it into the custom DNS server of the VPN and connect. You should be able to use the internet over the VPN as before, but now you have your own controlled adblocking via Pi-Hole and the security of knowing your server does not keep logs or any history. You should, assuming your VPN is trustworthy, be essentially invisible on the internet now.

I hope this write up was helpful! I’ve been tinkering with these projects for some time off and on.

One last tip: If you find a website is blocked improperly from Pi-Hole, you may need to enable logging again (reversing the items from Step 1, above) to whitelist the problem domain. Don’t forget to turn logging back off after!